 |
Marsico
Hall Microscopes Facility
(MHMF.ORG) |
 |
|
Leica Stellaris5 Laser Scanning Confocal Microscope with WLL & UV lasers
|
|
Location: 7228A Marsico Hall
|
|
Marsico Lung Institute
|
0. Notices
- This confocal system is owned by the Marsico Lung Institute/Cystic Fibrosis
Research Center:
- Use is limited to approved and trained users
- Please arrange orientation, training and sign on access with Michael
- Ultimate permission to use the system is
at the discretion of the MLI/CF Center Director
- Use should be logged recording 1. User; 2. Lab(s); 3. Project(s)
including chart string field
- System must be started correctly with particular attention to
objective selection, z-position, stage clearance, upper limit setting
- While searching and viewing samples by eye very careful attention must be
taken to not focus up into the sample
holder, especially when near edges of samples
- Don't focus into slide. The stage can be buckled and the objective
damaged.
-
Booking calendar or
from
http://microscopy.unc.edu/booking
-
Machine must be shut down correctly with attention to:
- Laser shut down in LAS X software
- Careful objective cleaning if glycerol or oil used, lowering objective turret,
putting 5x or 10x objective in light path,
- Exiting LAS X software and letting
it shut down completely before logging off,
- Keying off laser emission,
turning off laser power and master power (Only after lasers have been shut
down in the LAS X software)
-
Environmental chamber supports temperature and humidity
control, CO2 (0 - 10%), hypoxia
-
If environmental chamber is going to be used contact Michael about
changing stage top box, objective clearance & condenser height setting in order to prevent stage
crashing into condenser
-
Connecting to file shares (SOM server), e.g. CF Groups/shared, MHI
groups, Peds groups
1. Operating the system
- Note: Before viewing your sample the system should be powered up and
the LAS X software initialized as described below
- Quick Guide:
- Powering up:
-
 Check that microscope table is correctly floating - ~5 mm from top of aluminum to underside of rubber disk
(adjust red knobs if necessary)
Check that microscope table is correctly floating - ~5 mm from top of aluminum to underside of rubber disk
(adjust red knobs if necessary)
- Turn on power strip switches in order #1 (wait ~5 seconds) then
#2 to #4 each with 3 second wait
- At master box
- 1. Turn on master switch (#5) - wait >=5 seconds
- 2. Turn on laser switch (#6)
- 3. Turn on Emission key (#7)
- Log into computer - use your local account
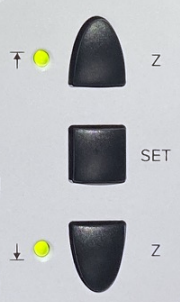
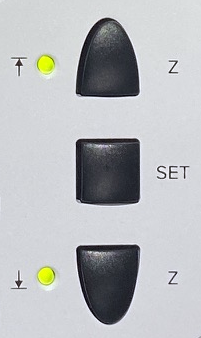
- Objective must be lowered - push and hold Z
down button (see picture on right), or set focus to course and turn
the larger course focus knob in the down direction.
- Place 5x, 10x or no objective in light path in order to avoid
the stage crashing an objective (turning by hand is OK)
- Ensure nothing will get in the way of stage movement - e.g. chambers, dishes,
wires, etc. ESPECIALLY TO THE LEFT OF HE STAGE.
- If a stage top box is present ensure condenser will not hit
the stage top box when initializing the x-y motorized stage -
- i.e. swing the condenser back
- Once the microscope stand display has finished initializing start
the LAS X software
-
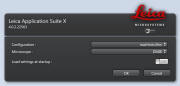 Choose
- Initialize stage if going to use programmed
x-y position control or tiling
- Find sample by eye
- Once LAS X software is running sample can be viewed
by eye
- On first startup cycle - power off the LED 3 light source off
for ~3 seconds then back on. Switch is on the left of the unit. Only need to do this once on first view.
(Its some sort of mysterious safety
procedure)
- Find and focus on sample. And set upper limit.
- Simple Scanning:
-
Select settings from choice of:
- - Load a previously saved .seq file
- - Load previously scanned
image and "Apply Settings"
- Note manually set Format, and zoom desired (Right click
and choose "Properties" on previously saved scans if you
want previously used settings )
- - Dye manager (more challenging)
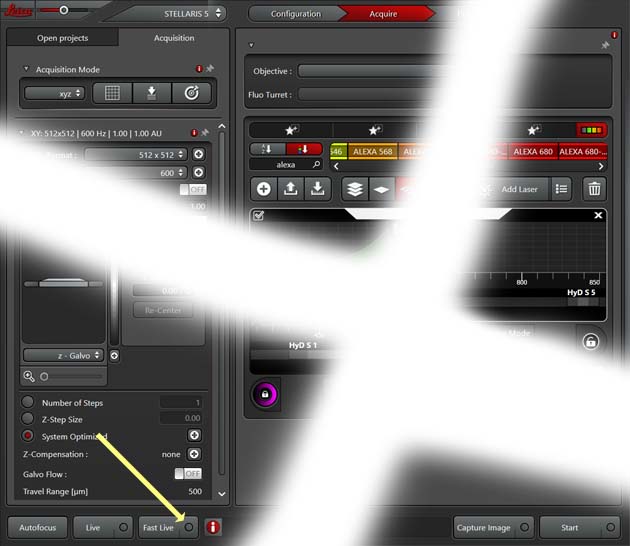
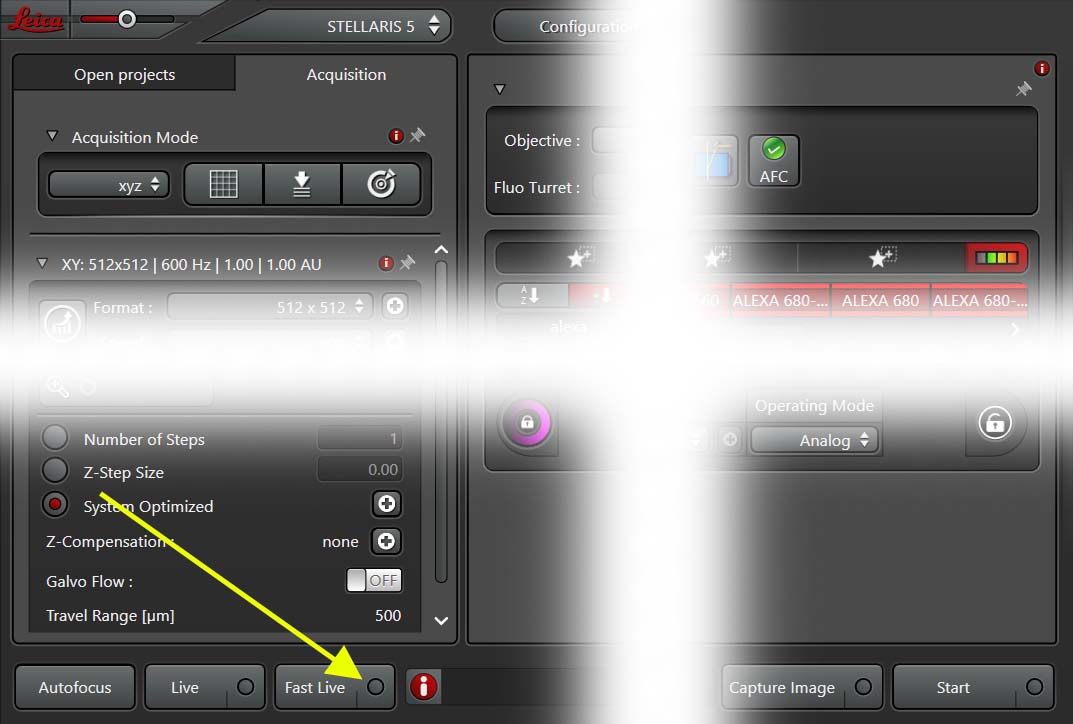
- On first scan only setup "Fast Live" options:
- Click on
circle at right of "Fast Live" button
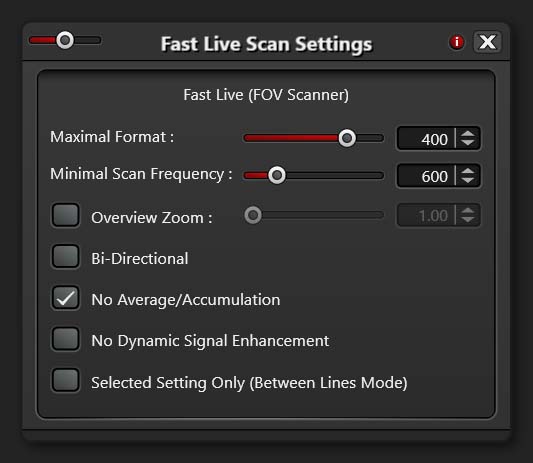
- ON "Fast Live Scan Settings" choose "Maximum Format" of 400
and unselect "Selected Setting Only (Between Lines Mode)"
- Be careful of bleed through if doing simultaneous scanning.
(i.e. When not acquiring all channels sequentially)
- Sequential scanning is much preferred to
ensure no bleed through
- Set Zoom and Pixel size to adequately sample
data
- Set averaging to reduce noise
- "Live" to view all channels
- "Fast Live" to show only selected channels
- Adjust PMT gain mostly or laser power. When viewing multiple
channels ensure multiple channels are displayed (Click on
image panel to switch between single panel & multiple panel
display)
- Save experiments as .LIF
- If Exports do not work correctly try using LAS X core free viewer
for Windows instead
- Shutting Down:
- Lower stage with course focus button on
right side of scope body
- Clean oil or glycerol off objective(s) if used. Lens tissue -
gently blot on glass lens with different areas of dry lens tissue.
Can gently rub metal body of objective.
- Power off lasers in software
- Exit LAS X software
- Put 5x, 10x or empty objective into light path
- Transfer data to a server - e.g.
SOM shared server
- Wait for LAS X software to close completely <-- THIS IS IMPORTANT
-
 Turn off hardware:
- Emission key #7
- Laser power switch #6
- Master unit switch #5
- New procedure:
Power strip off switches in reverse order #4,
#3, #2 but leave on #1 for 1 minute to allow
laser unit to cool
- then turn it off
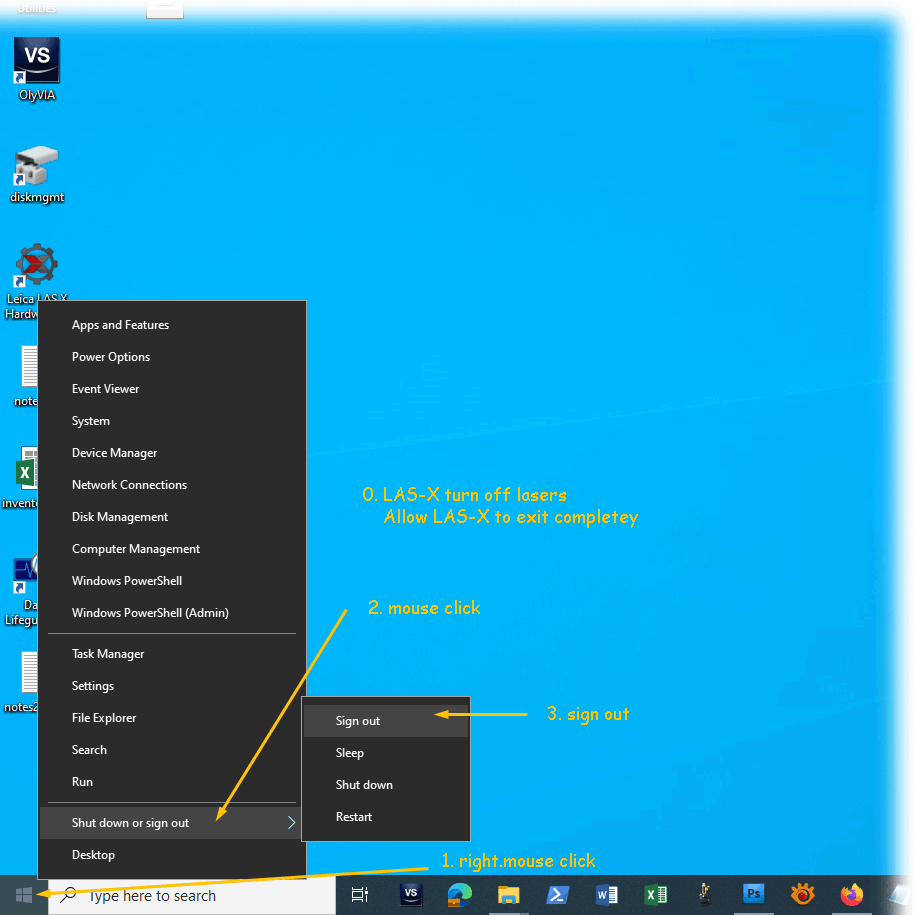
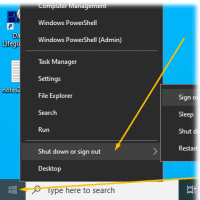
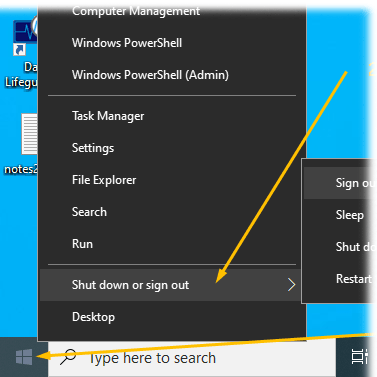
- Sign out from Windows <-- This is
important too. (Please do not just "Lock the screen"
when done)
-
Right mouse click:
Window (bottom left)
- Click "Shut down or Sign out"
- Report any problems encountered - e.g. email Michael. Take
screen captures &/or phone pictures.
- Fill out log book
2. The System - see here for details
http://microscopy.unc.edu/confocal/
- Inverted microscope stand DMI-8
- Laser Spot Scanning Confocal Microscope
- Lasers: 405 nm continuous wave diode & Super continuum pulsed white light laser 485 nm
(blue) to 685 nm (far red)
- Five Hybrid Photo Multipliers Tube (PMT) light detectors with emission spectral
discrimination
- High precision galvanometer z-axis positioning and motorized x-y
positioning stage
- Environmental chamber for temperature, humidity and CO2 control with
hypoxia
2.1 Lasers (excitation wavelengths):
- "UV" Diode laser 405 nm e.g. DAPI,
photo activation
- "White Light Laser"
Pulsed White Light
Laser from 485 nm to 685 nm, up to 8 wavelengths can be selected
e.g. Texas
Red, Alexa 568, Alexa 594, mCherry, will also excite Rhodamine, TRITC, DsRed & Alexa 543
2.2 Objectives:
| Objectives * |
|
| Mag. |
NA |
type |
WD |
corrections |
cover slip |
Immersion |
part no. |
DIC |
Resolution-xy+ |
resolution-z |
| Objective Wollaston |
Condenser Wollaston |
| 5x |
0.15 |
HCX PL Fluotar |
13.7 mm |
- |
|
air (dry) |
15506224 |
- |
- |
1.3 um |
? |
| 10x |
0.40 |
HC PL Apo |
2.7/2.2 mm |
- |
#1.5 |
air (dry) |
15506407 or
506285 |
- |
- |
0.49 um |
2.6 um |
| 20x |
0.75 |
HC Plan Apo |
620 um |
- |
#1.5 |
air (dry) |
15506517 |
- |
- |
0.26 um |
0.65 um |
| 40x |
1.25 |
Plan Apo |
350 um |
corr |
0.14 -0.18 mm |
glycerol |
15506422 |
E |
K7 |
0.17 um |
0.31 um |
| 63x |
1.4 |
HC Plan Apo |
140 um |
- |
#1.5 |
oil |
15506350 |
E |
K10 |
0.14 um |
0.27 um |
| L63x |
0.7 |
Plan Fluotar |
2.6 to 1.8 mm |
corr |
0.1 to 1.3 mm |
air (dry) |
11506217 |
- |
- |
0.23 |
0.72 |
** Dipping
lens, not kept on turret + Approx. resolution
with pinhole=1.0 Airy unit
WD = working distance DIC = differential
interference contrast or Nomarski
2.3 Detection:
- Emission spectral separation through a prism
- Five tunable detection bands with adjustable spectral windows before the
five Photo Multiplier Tubes (PMT) type HyD S (Hybrid GaAsP) 410 nm to 850 nm
- Standard XY scanning with zoom and rotation
- XZ rapid scanning using galvanometer stage (range +/-250 um)
- XZ scanning using microscope stand's fine focus (range mm's)
- Transmitted light and DIC (non confocal)
2.4 Direct Eye Viewing Fluorescent filters (Widefield, i.e. not confocal)
|
Epifluorescense cubes used for viewing by eye
(not confocal scanning)
|
|
|
LCD display |
Carousel Position # |
Leica cube ID |
Leica part |
Excitation Color of light |
Emission Color |
Beam splitter |
Typical fluorophores |
|
|
Analyzer |
|
(Empty) |
|
- |
- |
|
- |
|
|
LED-405 |
|
|
15525338 |
UV 405/60 |
470/40 |
455 |
DAPI, Hoechst |
|
|
GFP |
|
|
15525314 |
Blue BP470/40 |
525/50 |
495 nm |
FITC, eGFP, eYFP, FM 1-43,
CY2, Alexa 488 |
|
|
RHOD LP |
|
|
15525303 |
Green BP539/45 |
|
|
Texas Red, Rhodamine,
CY3, Alexa
555/568/594 |
|
|
(SCAN) |
|
(Empty) |
- |
- |
- |
|
|
|
| |
|
|
|
|
|
Leica fluorescent cube information |
Cube
information 3rd party
3. First time use (new user)
4. Known Bugs
- For multichannel scans need to have multiple panels open for smart gain
& smart laser adjustments correctly. (With single panel mode a hidden
channel will be adjusted). On single mode double click on single image
to restore multiple panels.
5. Viewing Files
- Leica LAS X Office - This program runs under Windows 10 is available on the
\\minsky.med.unc.edu server
- Leica LAS X core - This program runs under Windows 10 & 11 is available on the
\\minsky.med.unc.edu server
- FIJI
- Imaris
8. Leica confocal Image analysis and processing
LAS X core - Good for viewing.
Limited processing.
LAS X Office (Windows 10 only) - Good for viewing.
Limited processing.
Fiji
Volocity
7. Links
8. Reporting Problems
Please contact Michael
Leica Confocal Service and Support
866-830-0735 8:00 A.M. to 5:00 P.M.
confocal@leica-microsystems.com
serial number 820000189
Note: if you contact Leica
directly please let Michael know
Installation date: 2020-10-05
10. Dealing with software crashes and Microscope
Stand Lock Ups
- Dye manager tends to put detection wavelength too close to excitation
line. Hence reflections are prone to occur especially from grass
surfaces.
11. Applications:
Leica LAS X core 3.9 - free off line viewing and exporting
http://fiji.sc
 Check that microscope table is correctly floating - ~5 mm from top of aluminum to underside of rubber disk
(adjust red knobs if necessary)
Check that microscope table is correctly floating - ~5 mm from top of aluminum to underside of rubber disk
(adjust red knobs if necessary)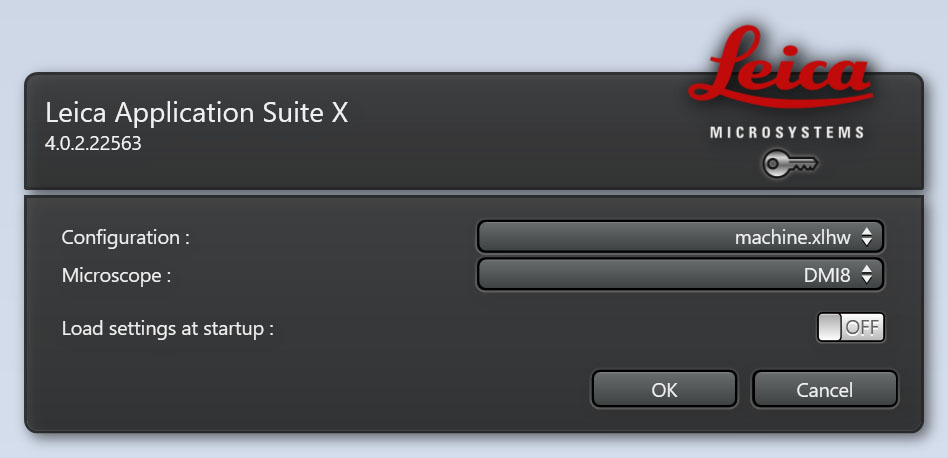 Choose
 Turn off hardware: