Image Handling - Overlaying Images |
Using Photoshop - RGB channel method
Overlaying images using PhotoShop requires that the image files be gray scale.
Images can be converted a number of ways including using Photoshop (see below).
Be careful, some ways of converting will loose intensity resolution and even distort
the intensity levels.
Open Image(s) in PhotoShop. (Note these instructions are specific to
Photoshop 5)
- Convert to grayscale in PhotoShop by clicking on the title bar of the open
image and using 'Image -> Mode -> Grayscale' with the mouse.
- Select the source (donor) image by clicking on the title bar and paste it to the clip
board by pressing '^A' (control-A, select all) then '^C' (control-C, copy to
clip board) on the keyboard.
- Select the image to be overlayed (recipient) by clicking on the title bar and convert it
to an RBG color image by clicking on 'Image -> Mode -> RGBcolor'
with the mouse.
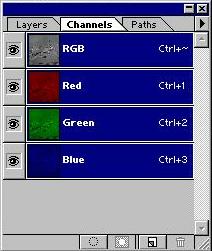 Open the channel box in Photoshop, if
necessary, by clicking on 'Window -> Show Channels' (if it reads 'Hide
Channels' then the box is already on display on the screen).
Open the channel box in Photoshop, if
necessary, by clicking on 'Window -> Show Channels' (if it reads 'Hide
Channels' then the box is already on display on the screen). 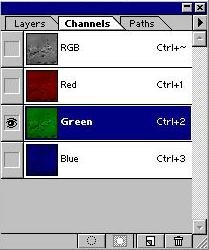 Choose the color channel into
which the source (donor) image is the be placed by clicking on the desired color bar (red,
green or blue, see to the left). Only the selected color channel will be highlighted
in blue (see box on the right).
Choose the color channel into
which the source (donor) image is the be placed by clicking on the desired color bar (red,
green or blue, see to the left). Only the selected color channel will be highlighted
in blue (see box on the right).- Paste the source image (donor) by pressing '^V' (control-V, paste from clip board).
The green channel should now display the donor image. One may click on 'Channels' in
the Channel box to see the entire image. The recipient image should appear purple
and the donor channel should be green in this example.
 The recipient image can be made red by
erasing the blue channel to black. Select the blue channel and press '^A'
(control-A, select all). Make sure that the background color in the
PhotoShop tools box is true black (double click on the black square, opens color
picker) then press 'delete' in order to make the blue field black. Now
clicking on the RGB bar of the PhotoShop 'channels' box will show the donor image in green
and the recipient image in red.
The recipient image can be made red by
erasing the blue channel to black. Select the blue channel and press '^A'
(control-A, select all). Make sure that the background color in the
PhotoShop tools box is true black (double click on the black square, opens color
picker) then press 'delete' in order to make the blue field black. Now
clicking on the RGB bar of the PhotoShop 'channels' box will show the donor image in green
and the recipient image in red.
The overlayed image may now be saved.